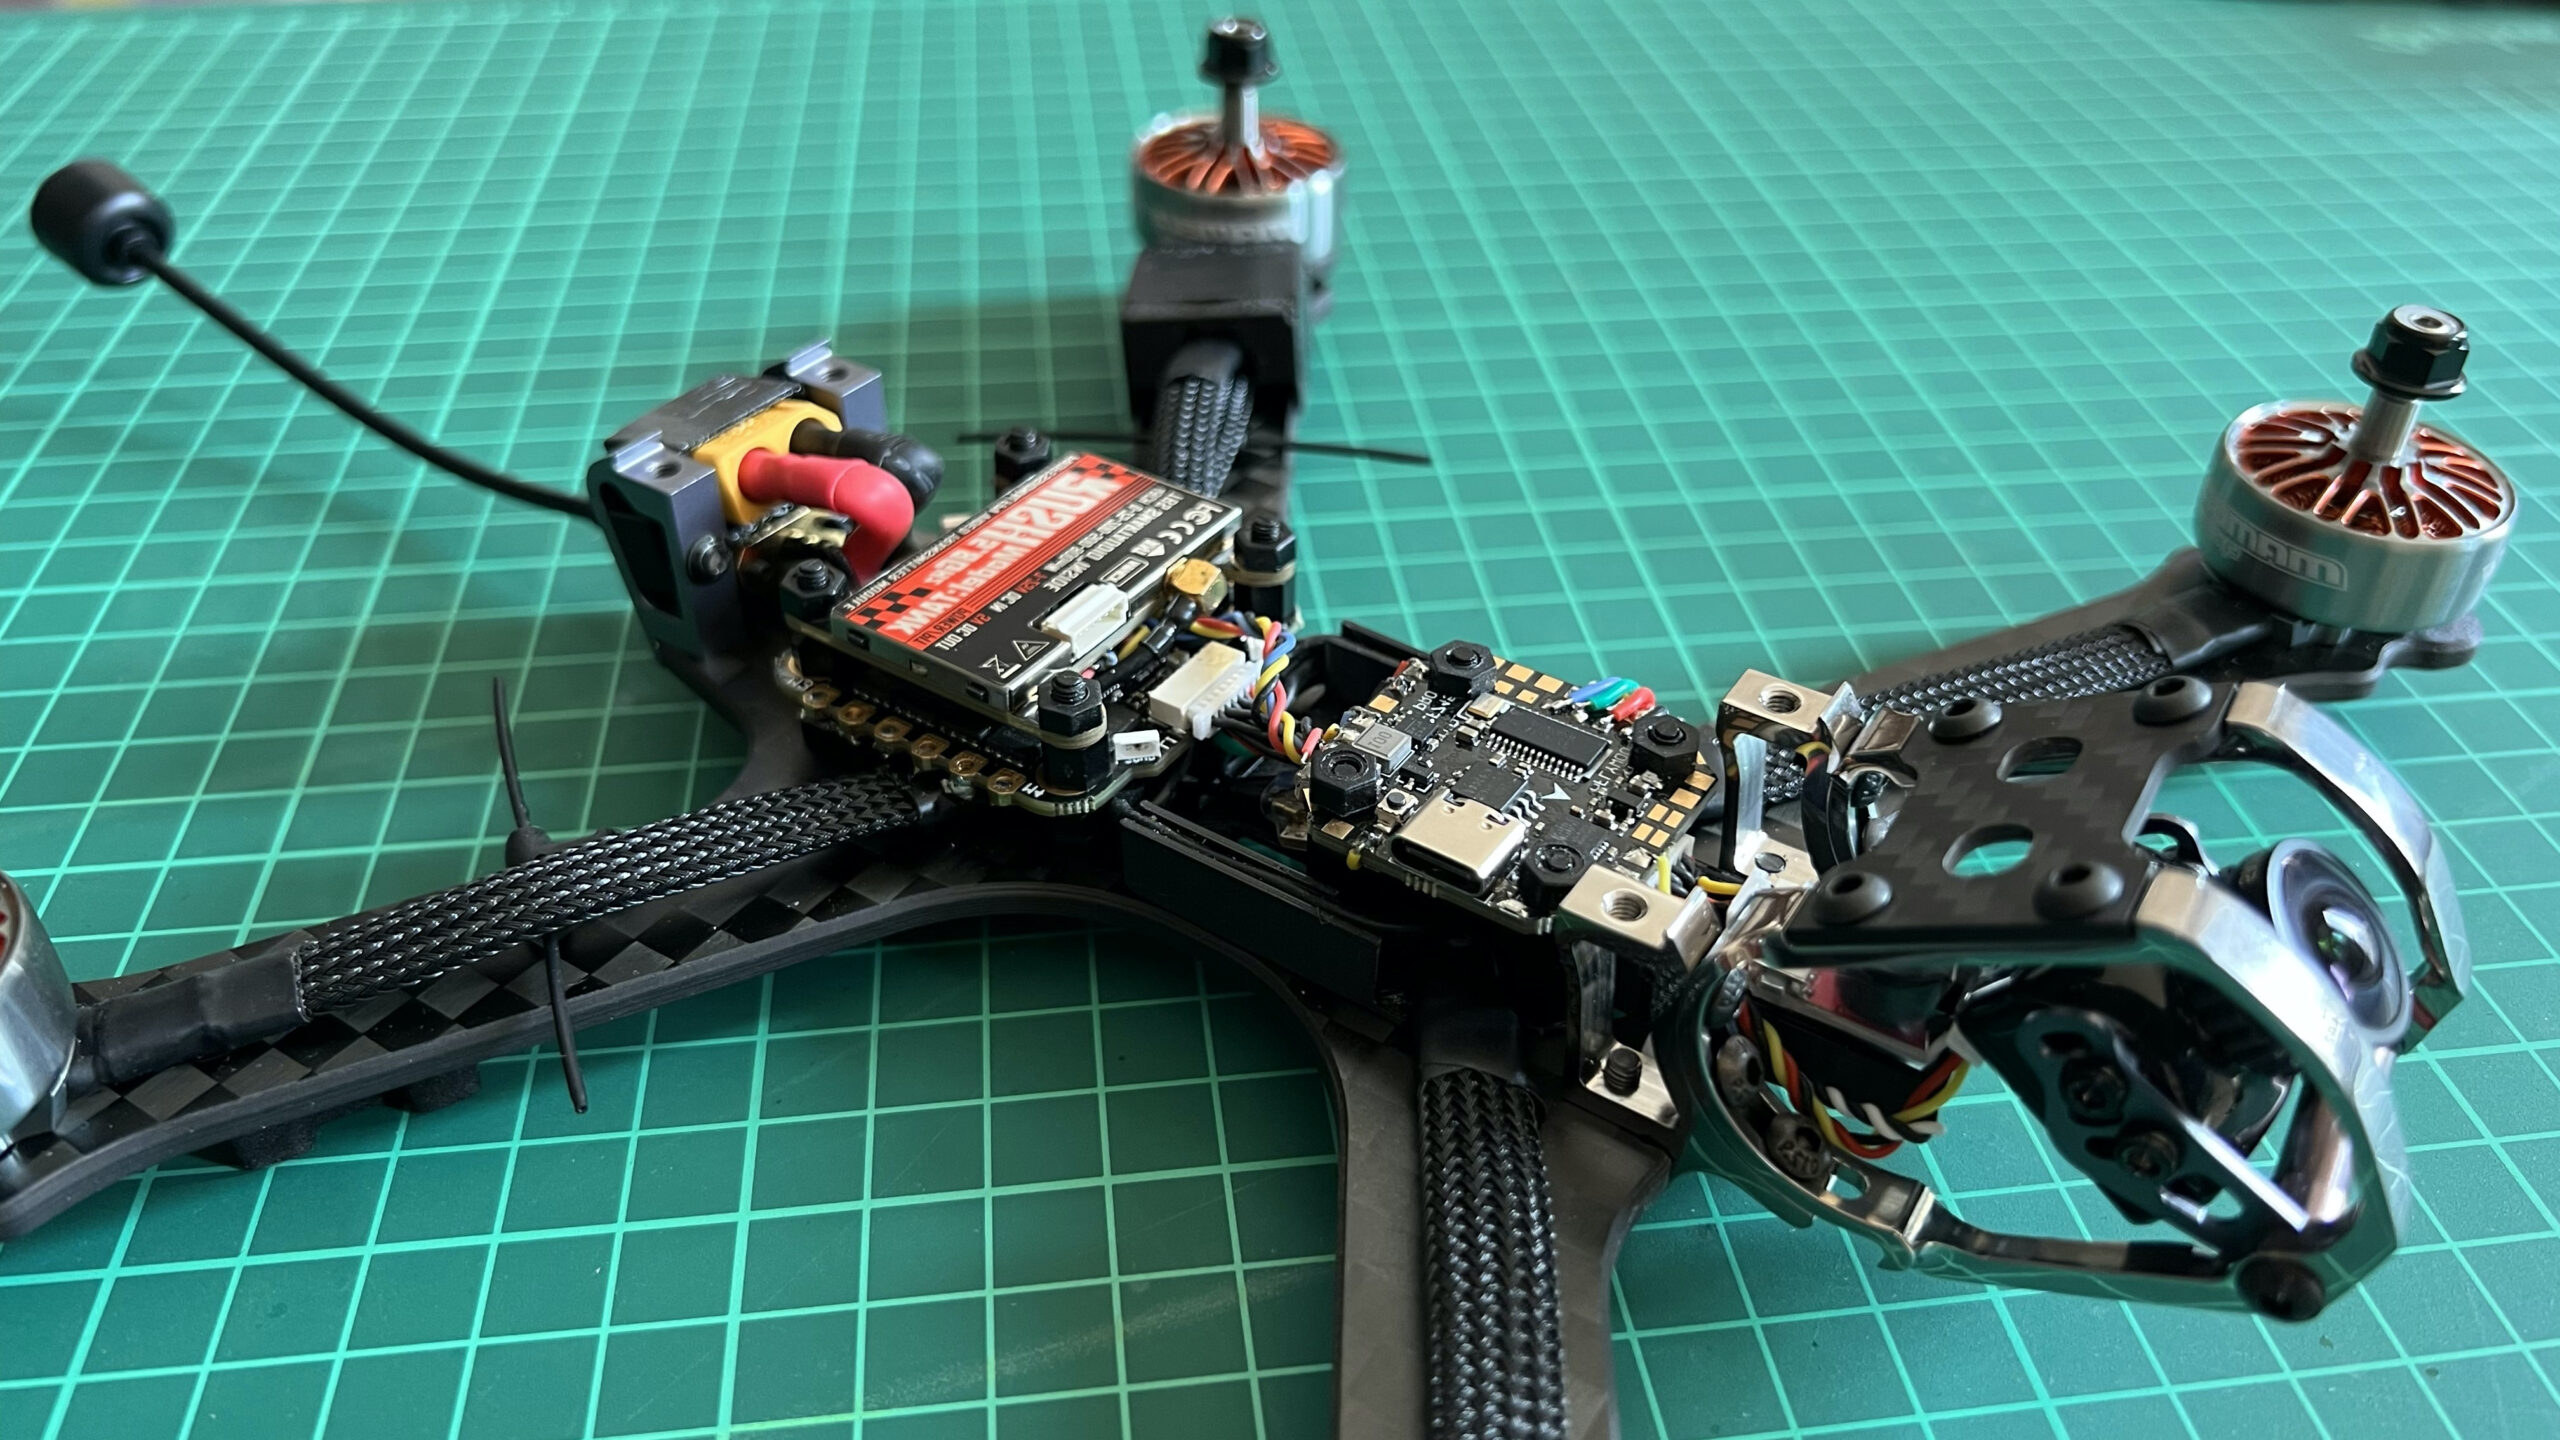
I converted my existing Armattan Marmotte Megabat drone from analog VTX to digital VTX using the new Walksnail Avatar digital setup. To date, the Armattan Marmotte frames are not particularly Avatar-friendly unless you have access to a 3D printer. I encountered challenges to efficiently mount the 25.5mm x 25.5mm VTX on the frame, fit the slightly-too-small micro camera on the Marmotte, and deal with the dual antenna mounts. Building a new drone, I’d probably place the VTX at the rear, and choose a 20 x 20 mm ESC / FC stack for easier mounting.
Before (analog)
My analog setup had the FC at the front, and the VTX at the rear.
After (digital)
My digital setup has the FC at the rear, and the VTX at the front.
Here are the challenges I encountered, and how I resolved them.
Avatar VTX needs a bespoke mounting to front-mount on Marmotte frame
The Marmotte does not have the correct mounting holes for the Avatar VTX, and the enclosure space is extremely tight both length-wise and height-wise. For me, moving my ESC from the rear would have resulted in a major re-work of the drone. I decided not too owing to the large soldering and motor wire-length hassle. I also like the ESC at the rear for the XT60 connector, and it doesn’t hang over the body of the frame. I therefore re-mounted components as follows:
- Rear, using 30 x 30 mm mount: the 4-in-1 ESC and FC
- Front, using a pair of the 20 x 20 mm holes to secure a 3D-printed adapter for the VTX
A 3D-printed stack converter is required, as the Avatar VTX is a 25.5 x 25.5mm stack, and the Marmotte comes with a rear 30 x 30 mm and front 30 x 30 mm or 20 x 20 mm stack. Alas, neither are suitable, as the VTX outer dimensions are too large (33 x 33 mm). I made a 3D-printed stack converter that shifts the VTX backwards.
Avatar micro-format camera needs mini-format camera cage mounting
The Marmotte prefers a “mini” size camera, which is 21 x 21 mm. The camera that comes with the Avatar has compatible screw holes, but is slightly smaller, at a size of 19 x 19 mm. The additional problem with a micro camera in the Marmotte frame is that camera cage obscures the camera view. One needs to 3D-print a couple of shims that pad the width and bring the camera forward a little bit so the view is not restricted.
To build it, you’ll need:
- 2 x 3D-printed shims based on my Thingiverse Walksnail Avatar Micro to Mini Camera Adapter model
- 8 x M2 screws (3mm length)
- 4 x M2 plastic nuts
Switching from a single antenna to a double antenna requires new mounts
The analog VTXs connect to one antenna. The Avatar has two antennas, that need to be mounted V-shaped at the rear of the drone. This means the a 3D-printed adapter to hold them at the correct angle. My antenna mounts are on Thingiverse.
My mounts attach to the two rear stack posts and angle back. In test flights this configuration appears to work fine, with good quality video signal. The antennas rise up to the battery pack, protecting them from snapping off.
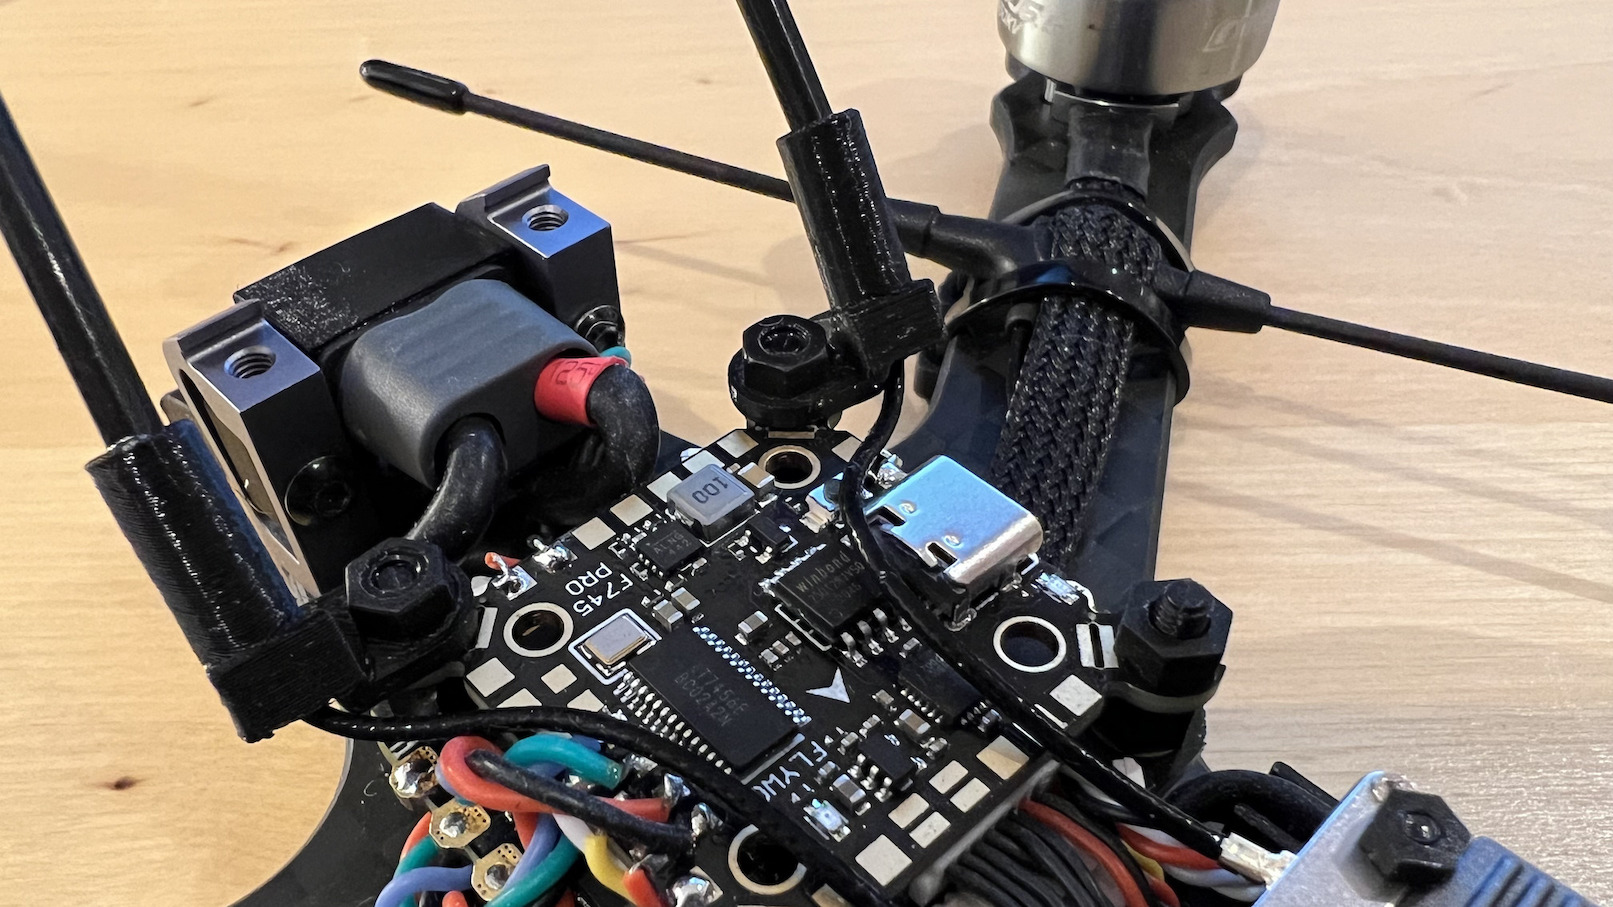
Moving location of GPS
I had my GPS on the rear arm of the frame. I moved it to the rear to tidy the build, but the signal interference from the Avatar VTX resulted in no GPS pickup. See my Solving GPS issues with Walksnail Avatar post. In the end I had to move it to above the battery to receive a signal.

Conclusion
The Armattan Marmotte is a great frame, but it’s not Avatar-friendly out of the box. My observations are:
- The Avatar VTX frame mount is a different size to any of the pre-drilled holes in the Marmotte frame
- The mounting clearance of the Avatar VTX and the ESC/FC will not give enough clearance, especially with the battery straps. Not to mention the VTX runs HOT and needs a bit of an air gap
- A FC, 4-in-1 ESC, and VTX is a tight squeeze in the frame (not to mention the RX and buzzer)
- If you place the 4-in-1 ESC at the front and the VTX at the rear, the VTX has better routing for antenna mounting, but a large ESC will overhang the frame and result in unsightly cabling. Choose a 20 x 20 mm ESC to avoid this
- If you front-mount the VTX, you actually have to mid-mount it with a 3D-printed mount, as the front holes are too near the camera to utilize a simple shim
- On-arm individual ESCs would make it much easier to find frame space, with all the disadvantages of on-arm ESCs
- The camera needs a shim to fit into the cage, and the shim needs to bring the camera forward to avoid seeing the cage in the video frame. This results in the camera lens poking out of the cage a bit
- The GPS mounting is problematic, as the VTX creates a lot of noise. Tail-mounting or arm-mounting doesn’t get the GPS far enough away from the noise – only above the battery worked for me
you should really replace walksnail anteannas with good ones like true rc ( if not done yet)
How is the performance, regarding the esc anf Fc on the rear being placed?
I noticed little difference as I always fly with a GoPro mounted on the front – thus the marginal extra weight on the back helps balance the GoPro weight. That being said, I built a newer drone (Baboon) that had the VTX at the rear and the ESC+FC at the front-middle and balance is not noticeable, yet the wiring is much more straightforward. So, for a refit, VTX at back all good, but a new build, I’d go with 20×20 ESC+FC stack in front-middle and VTX at back. The frame mounting positions (especially on a Armattan frame) and weight of the GoPro are the big factors.